


DarkFighter Technology
DarkFighter technology enables clear, full-color imaging in low light.
DarkFighter technology enhances low-light imaging with advanced sensors and processing for clear, full-color visuals.

TandemVu Technology
TandemVu combines fixed and PTZ lenses for efficient dual surveillance.
TandemVu technology integrates fixed and PTZ lenses in one camera, delivering efficient, dual-purpose surveillance for enhanced security and monitoring.

ColorVu Technology
ColorVu Technology enables full-color surveillance for enhanced security.
ColorVu Technology by Hikvision delivers full-color, 24/7 surveillance with high-sensitivity sensors and built-in lighting for enhanced low-light security monitoring.
Acusense technology
AcuSense Technology uses AI to detect humans and vehicles accurately.
AcuSense Technology by Hikvision uses AI to accurately detect humans and vehicles, reducing false alarms and enhancing surveillance efficiency.
Hikvision Dubai - CCTV & IP Camera Distributor in Dubai & UAE
Hikvision Dubai is your trusted source for advanced surveillance systems and security solutions across Dubai and the UAE. We offer a wide range of Hikvision products, including CCTV cameras, IP cameras, and ColorVu technology for clear, vibrant images even in low light. Ideal for homes, offices, and industrial sites, our WiFi-enabled cameras provide seamless remote monitoring and reliable performance. Features like DarkFighter, TandemVu, and AcuSense ensure smart, efficient security tailored to your needs. At Hikvision Dubai, we combine cutting-edge technology with competitive pricing, delivering high-quality surveillance solutions for residential and commercial properties. Upgrade your security today with Hikvision.
Hikvision Dubai is your trusted source for advanced surveillance and security solutions. We offer CCTV cameras, IP cameras, and ColorVu technology for clear images even in low light. With DarkFighter, TandemVu, and AcuSense features, our cameras deliver smart security for homes, offices, and industrial sites. Enjoy competitive pricing and reliable, high-quality surveillance solutions across Dubai and the UAE.
Get Free CCTV QuoteOur Products


Hikvision Technology Securing Your Future
Hikvision Dubai offers competitive pricing on top-quality security products. Discover advanced CCTV cameras, smart surveillance systems, and access control solutions designed for homes and businesses. Get reliable, high-performance security technology without compromising on quality or breaking the bank.
Expert Installation
Professional setup and configuration by certified technicians
24/7 Support
Round-the-clock technical assistance and monitoring
Warranty Coverage
Comprehensive warranty and maintenance plans
Hikvision Nvr
Hikvision NVRs are advanced recording devices for IP cameras, delivering high-quality video, intelligent analytics, and remote access for efficient, scalable surveillance solutions.
Hikvision Nvr
Hikvision NVRs are advanced recording devices for IP cameras, delivering high-quality video, intelligent analytics, and remote access for efficient, scalable surveillance solutions.
Hikvision dvr
Hikvision DVRs are advanced recording devices for analog cameras, offering HD recording, remote viewing, and motion detection for reliable surveillance solutions.
Hikvision dvr
Hikvision DVRs are advanced recording devices for analog cameras, offering HD recording, remote viewing, and motion detection for reliable surveillance solutions.
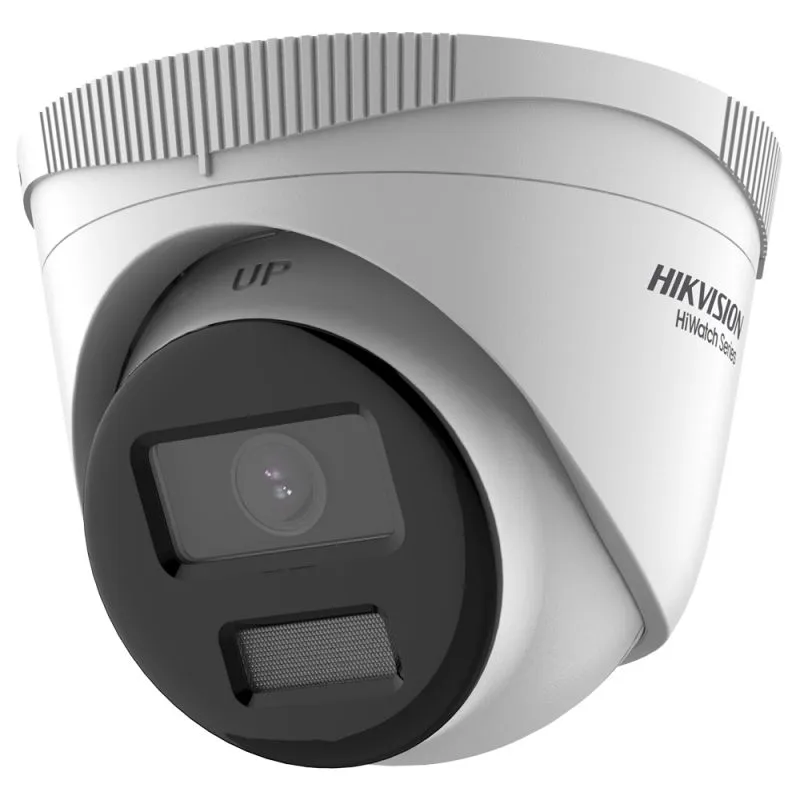
Hikvision CCTV Camera
The Hikvision CCTV Camera is a top-notch security camera that offers a crystal-clear and detailed view of your home or business. It's an excellent option for anyone looking to keep tabs on their property or for those who need to keep an eye on their business operations.
Hikvision CCTV Camera
The Hikvision CCTV Camera is a top-notch security camera that offers a crystal-clear and detailed view of your home or business. It's an excellent option for anyone looking to keep tabs on their property or for those who need to keep an eye on their business operations.
Smart Monitoring Systems
Smart Monitoring Systems delivers advanced surveillance solutions with Hikvision technology, offering cutting-edge CCTV cameras, DVRs, NVRs, and access control systems for unmatched quality, reliability, and innovation.
Smart Monitoring Systems
Smart Monitoring Systems delivers advanced surveillance solutions with Hikvision technology, offering cutting-edge CCTV cameras, DVRs, NVRs, and access control systems for unmatched quality, reliability, and innovation.
Network Cameras
Hikvision network cameras provide dependable security for businesses, homes, and public spaces, offering indoor/outdoor coverage, fixed or PTZ options, and top-tier performance for peace of mind.
Network Cameras
Hikvision network cameras provide dependable security for businesses, homes, and public spaces, offering indoor/outdoor coverage, fixed or PTZ options, and top-tier performance for peace of mind.
Hikvision PTZ Camera
The Hikvision PTZ Camera is a top-notch device that provides a full 360-degree view of your home or business. It's a fantastic choice for anyone wanting to monitor their property or for those who need to oversee their business activities.
Hikvision PTZ Camera
The Hikvision PTZ Camera is a top-notch device that provides a full 360-degree view of your home or business. It's a fantastic choice for anyone wanting to monitor their property or for those who need to oversee their business activities.
Hikvision WiFi Camera
The Hikvision WiFi Camera is an outstanding device that provides a sharp and detailed view of your home or business. It's a fantastic choice for anyone wanting to monitor their property or for those who need to oversee their business activities.
Hikvision WiFi Camera
The Hikvision WiFi Camera is an outstanding device that provides a sharp and detailed view of your home or business. It's a fantastic choice for anyone wanting to monitor their property or for those who need to oversee their business activities.
Hikvision IP Camera
The Hikvision IP Camera is an excellent device that offers a clear and detailed view of your home or business. It's a great option for anyone looking to keep an eye on their property or for those who need to manage their business operations effectively.
Hikvision IP Camera
The Hikvision IP Camera is an excellent device that offers a clear and detailed view of your home or business. It's a great option for anyone looking to keep an eye on their property or for those who need to manage their business operations effectively.
Frequently Asked Questions
Ask us anything about our brand and products, and get factual responses.
You can purchase authentic Hikvision products from Dubai Hikvision, an wholesale distributor of Hikvision in the UAE and Dubai. We offer a wide range of security and surveillance solutions to meet your needs.
We distribute a comprehensive range of Hikvision products, including CCTV cameras, DVRs, NVRs, access control systems, intercoms, and video management software.
Yes, all Hikvision products offered by Dubai Hikvision are 100% genuine and authentic. As an Wholesale distributor, we ensure the highest quality standards and provide products directly from Hikvision.
Yes, we provide installation services directly, we can recommend trusted partners who specialize in the installation and setup of Hikvision products. Feel free to contact us for referrals.
We offer comprehensive technical support and assistance for Hikvision products purchased through Dubai Hikvision. Our team of experts is available to help you with product inquiries, troubleshooting, and guidance.
If you're interested in becoming a reseller or partner with Dubai Hikvision, please contact us to discuss partnership opportunities and requirements. We welcome collaborations with businesses looking to distribute Hikvision products in the UAE and Dubai.